
Last Updated: September 9, 2026
Concrete resurfacing is a cost-effective way to restore a worn driveway, patio, or pool surround, but the results depend entirely on what happens before the new layer is applied. When a concrete resurfacing project fails, the cause is almost always traceable to one of seven predictable mistakes, most of which occur during preparation or in the first days after installation. Understanding these common reasons concrete resurfacing fails is the difference between a surface that lasts decades and one that peels within months. At Spray Pave Pro, we have spent over 23 years working with concrete resurfacing across Perth, and the patterns of failure are remarkably consistent.
The good news is that nearly every failure is preventable with correct substrate assessment and professional application. Below, we break down each cause and, more importantly, how to avoid it on your next project.
The single most common reason concrete resurfacing fails is inadequate surface preparation. A resurfacing material bonds to the slab through mechanical adhesion, which requires an open, porous surface profile. If the substrate is smooth, contaminated with dirt or oil, or has laitance from the original pour, the new layer has nothing to grip.
Proper preparation involves mechanical grinding, shot blasting, or acid etching to open the pores and remove surface contaminants. High-pressure cleaning alone is rarely sufficient for an existing slab that has years of grime embedded in its surface. Without this step, delamination is almost guaranteed, often appearing within the first year.
Many homeowners assume that a more workable mix means a better result, but excess water is a primary driver of failure. The water-cement ratio directly controls the compressive strength and porosity of the finished surface (cement.org). Too much water creates a weak, porous layer that lacks the structural integrity to support foot traffic or vehicle loads.
When the mix contains excess water, the surface dries faster than the interior, causing plastic shrinkage cracks to form before the material has cured. These micro-cracks become entry points for moisture ingress, which then leads to spalling as the surface undergoes freeze-thaw or thermal cycles. Professional applicators measure the mix precisely rather than relying on guesswork.
Moisture rising through the slab is a silent killer of resurfacing projects. Hydrostatic pressure from groundwater or poor site drainage forces moisture upward through the concrete's capillary structure. When this moisture reaches the interface between the old slab and the new overlay, it destroys bond strength and causes blisters or peeling.
Signs of a moisture problem include efflorescence, the white powdery deposit left on the surface, or a damp feeling slab before installation. A proper moisture test for concrete overlays should always be conducted before any material is applied. If the slab fails the test, the moisture source must be addressed first, which may involve improving drainage or installing a vapour barrier.
Concrete resurfacing is only as stable as the ground beneath it. If the subgrade was not properly compacted before the original slab was poured, settlement will occur over time. This ground movement creates stress cracks that telegraph through any resurfacing layer, no matter how well it was applied.
In many cases, the existing slab itself is the problem. A slab that is already cracked from settlement, or that lacks adequate reinforcement for its intended load, will continue to move. Applying a decorative overlay to a structurally unsound slab is a cosmetic exercise that will fail. The overlay cannot repair structural issues; it can only cover them temporarily.
Curing is the most overlooked phase of any concrete resurfacing project. Concrete gains its strength through hydration, a chemical process that requires moisture to continue over several days. When the surface dries too quickly, whether from hot sun, wind, or low humidity, the hydration process stops prematurely.
Rapid drying leads to plastic shrinkage cracks and a weak, dusty surface that fails to achieve its designed bond strength. Professional contractors use curing compounds or wet curing methods to slow the drying process. In Perth's climate, where summer temperatures regularly exceed 40 degrees, scheduling resurfacing work to avoid the hottest part of the day is essential for long-term durability (bom.gov.au).
Applying a new resurfacing layer over an old topical coating or sealer is a recipe for failure. The new material cannot bond to a sealed surface because the sealer blocks the pores of the concrete. The result is a sandwich effect, where the new layer adheres to the old sealer rather than the slab, and the entire system peels away as one sheet.
Identifying whether an existing coating is present is a critical step in concrete resurfacing preparation steps. A simple water test can help: if water beads on the surface rather than soaking in, a sealer is present and must be removed. Removal typically requires mechanical grinding or shot blasting, as chemical strippers often leave residue that also inhibits adhesion.
Oil, grease, and chemical spills are common on driveways and garage floors, but they are fatal to resurfacing adhesion. Surface contaminants penetrate the porous concrete and create a barrier between the substrate and the new material. Even small amounts of oil can cause a bond failure that spreads across the entire surface.
Chemical exposure can also damage the slab itself. Acidic substances, such as battery acid or certain cleaning products, can degrade the surface of the concrete, leaving it soft and friable. This deteriorated layer must be removed entirely before resurfacing, often requiring deeper grinding than standard preparation.
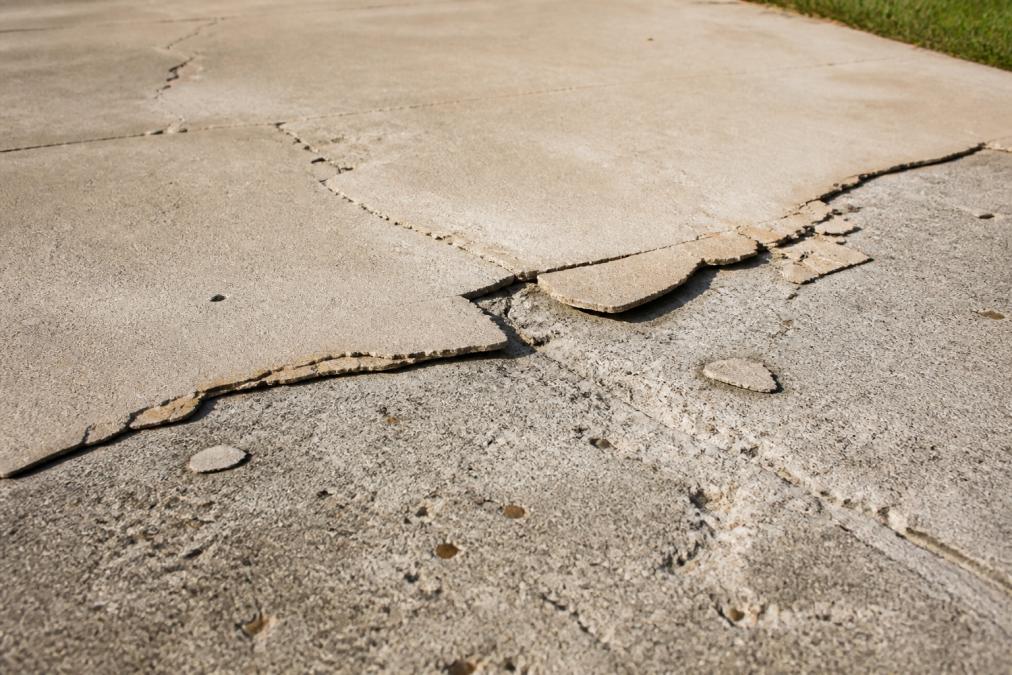
Surface preparation is not merely the first step in a resurfacing project; it is the step that determines whether every subsequent effort succeeds or fails. The bond between the overlay and the substrate is mechanical, meaning the resurfacing material must physically lock into the pores and texture of the existing concrete. A smooth, polished, or contaminated surface provides nothing for the new material to grip.
The correct preparation involves creating a surface profile with sufficient roughness to promote adhesion. Mechanical grinding with diamond tooling is the industry standard, as it removes both surface contaminants and a thin layer of the old concrete to expose fresh, porous material. Shot blasting achieves a similar result for larger areas, while acid etching is suitable for smaller jobs where the surface is otherwise sound.
What most guides miss is that preparation also includes repairing the substrate itself. Cracks, spalls, and other defects must be filled with high-strength repair mortars before the overlay is applied. Skipping this step means the overlay inherits every weakness of the slab beneath it, and those weaknesses will eventually surface as cracks or delamination.
Moisture testing is the diagnostic step that separates professional resurfacing from guesswork. The test measures the rate at which moisture moves through the slab, and it must be conducted before any material is applied. A slab that is releasing significant moisture will cause the overlay to blister and peel, regardless of how well the surface was prepared.
The most common test is the plastic sheet method, where a plastic square is taped to the concrete and left for 24 hours. If condensation forms under the plastic, the slab is releasing moisture and requires further investigation. More precise methods include calcium chloride testing or using a hygrometer to measure relative humidity within the slab.
If testing reveals a moisture problem, the overlay cannot proceed until the source is addressed. This may mean improving site drainage, repairing leaking pipes, or installing a moisture barrier. Resurfacing over a damp slab is the fastest way to waste money on a project that will fail within months.
When peeling has already occurred, the first question is whether the damage is localised or widespread. Minor peeling at the edges of a surface can sometimes be repaired by grinding back the affected area, reapplying the material, and blending the edges. This is only viable if the bond in the remaining areas is sound and the underlying cause has been corrected.
Widespread peeling, however, usually signals that the entire overlay has lost its bond to the substrate. In this case, the failed material must be completely removed, the slab re-prepared, and the surface reapplied. Patching individual areas of a failed overlay is rarely successful because the same conditions that caused the initial failure will compromise the repair.
The cost of repair is often comparable to the cost of replacement once the labour of removing the failed material is factored in. This is why the upfront investment in professional surface preparation is so important. A properly prepared surface will outlast the decorative finish, while a poorly prepared one will fail regardless of the quality of the material used.
| Failure Cause | Early Warning Sign | Prevention Method | Impact of Ignoring |
|---|---|---|---|
| Poor surface preparation | Peeling within 12 months | Mechanical grinding to open pores | Full overlay replacement |
| Excess water in mix | Plastic shrinkage cracks | Precise water-cement ratio | Weak, porous surface |
| Moisture ingress | Efflorescence or blistering | Moisture testing before application | Bond failure and delamination |
| Subgrade movement | Cracks following settlement patterns | Structural slab repair first | Cosmetic cover-up that fails |
| Rapid drying | Surface crazing in first week | Curing compounds or wet curing | Reduced strength and durability |
| Incompatible old coatings | New layer lifts in sheets | Remove sealer via grinding | Complete delamination |
| Chemical contamination | Visible oil stains or soft spots | High-pressure cleaning plus grinding | Localised bond failure |
The financial argument for professional preparation is straightforward: the cost of fixing a failed resurfacing job is always higher than the cost of doing it correctly the first time. When an overlay fails, the homeowner pays for the removal of the failed material, the repair of any damage to the underlying slab, and the application of a new overlay. That is three jobs instead of one.
There is also the matter of downtime. A failed driveway or patio is unusable during the repair process, and the disruption to a household or business is significant. For commercial properties, the operational impact of repeated resurfacing failures can be substantial.
Working with an experienced contractor reduces this risk. Professionals understand the common reasons concrete resurfacing fails and have the equipment and knowledge to address them before they become problems. As documented in Cement Concrete & Aggregates Australia guidance on surface preparation, the bond between overlay and substrate is the critical determinant of long-term performance.
The difference between a resurfaced surface that lasts decades and one that fails within a year comes down to the fundamentals: surface preparation, moisture control, and correct application. These are not areas where shortcuts pay off. Whether you are preparing a home for sale or upgrading a commercial floor, the integrity of the finished surface depends entirely on the work done before the first layer of material is applied.
At Spray Pave Pro, our 23 years of experience in Perth has taught us that every failure is preventable with the right approach. We provide comprehensive surface preparation, professional spray-on concrete application, and expert sealing to ensure your resurfacing project delivers the durability and curb appeal you expect. Our 100% satisfaction guarantee reflects our confidence in getting the preparation right the first time.
For a free quote on your concrete resurfacing project, contact the Spray Pave Pro team today. We will assess your slab, identify any potential issues, and recommend the approach that will give you a surface built to last.
Peeling spray-on concrete usually means the overlay has lost adhesion to the slab below. The most common triggers are inadequate surface preparation, moisture rising through the slab, or applying the coating over an incompatible old sealer. If the concrete was not mechanically ground or cleaned properly, the new layer cannot bond. Moisture testing before application is critical. Fixing peeling concrete rarely works by simply recoating over the top; the failed material must be removed and the underlying cause addressed first.
A suitable slab needs to be structurally sound, free of deep cracks, and clean of any existing coatings, sealers, or surface contaminants like oil. The concrete must also be dry enough to accept an overlay. A simple moisture test, such as taping a plastic sheet to the surface for 24 hours, can reveal trapped moisture. If water droplets form under the plastic, the slab is releasing moisture and needs a moisture barrier or a specialised overlay system. Professional testing is recommended before committing to a full resurface.
Yes, but only if the cracks are first repaired and the cause is addressed. Hairline shrinkage cracks can often be filled with a repair mortar or epoxy injection. However, if cracks are caused by ongoing ground movement or a failing subgrade, a new overlay will simply crack in the same place. The slab needs to be assessed for structural integrity before any resurfacing work begins. Attempting to cover active structural cracks with a thin coating is a temporary fix that will fail.
With proper surface preparation and installation, a quality concrete overlay can last 10 to 15 years or more. The lifespan depends on several factors: the condition of the original slab, the quality of the materials used, exposure to harsh weather, and ongoing maintenance. Regular cleaning and resealing every few years helps protect the surface from moisture ingress and wear. Choosing an experienced contractor who follows correct preparation steps, including moisture testing, is the best way to ensure a durable finish.
