
Last Updated: September 18, 2026
Concrete surface preparation for epoxy floor installation is the single biggest factor in whether your floor lasts or fails. Most guides treat prep as a cleaning job, but it is really a bonding and moisture-control job, and the moisture side is where most floors die.
Moisture vapour transmission (MVT) is water vapour migrating up through a slab from the soil beneath. It is not the same as a damp surface: a slab can look bone dry and still push enough vapour up to lift a coating from below, causing epoxy to blister, peel, and delaminate, often within 12 months.
Most manufacturers publish a maximum MVT rate, commonly 3 to 5 lb/1,000 sq ft/24 hr for standard systems, lower for moisture-sensitive primers and topcoats. In-situ RH limits are typically 75-80%. Always check the product data sheet, as limits vary by system and coat thickness.
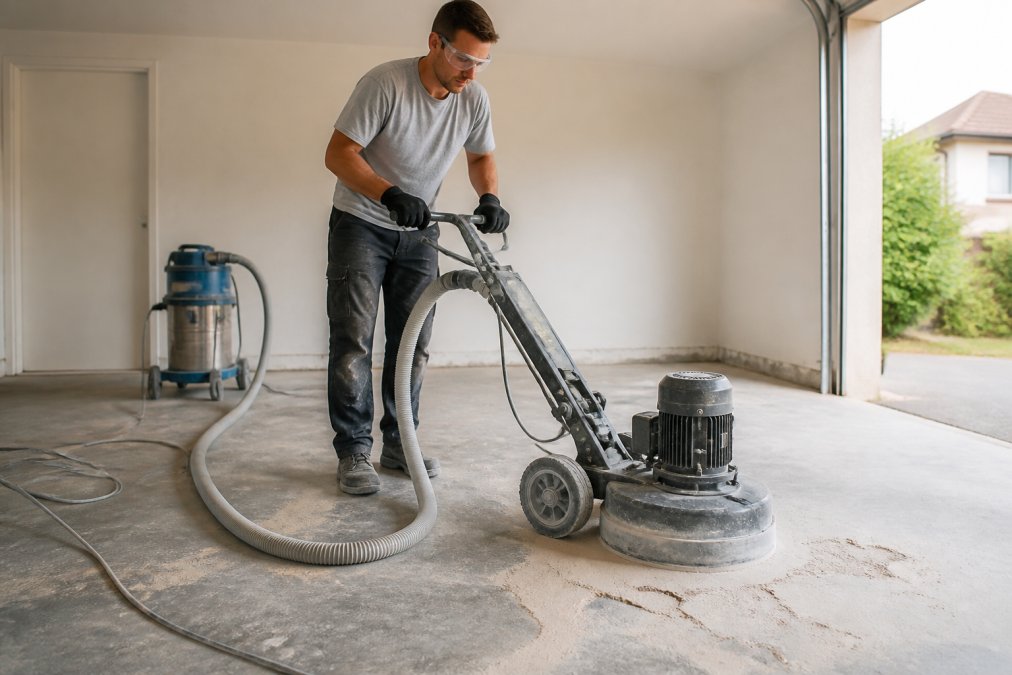
Once moisture is controlled, the surface must be opened so epoxy can mechanically key in. The benchmark is a Concrete Surface Profile (CSP) of around CSP 2 to CSP 3, a light-to-medium profile like coarse sandpaper. Diamond grinding is the most controllable way to hit it; acid etching works but is harder to keep even and leaves residue that must be neutralised and rinsed.
Cracks and holes need filling before coating. Epoxy filler is the right product, not a cosmetic patch.
The sequence matters:
Etching opens the concrete's pores so epoxy can bond, either chemically or mechanically. Diamond grinding is generally preferred for a more consistent and aggressive profile.
Watch for these signs the profile isn't right:
The right tools for epoxy floor application make the difference between a smooth finish and a streaky mess. You don't need everything here, but you need the essentials.
| Tool | Purpose | Why It Matters |
|---|---|---|
| Diamond grinder | Surface profiling | Opens pores for bonding |
| Squeegee | Spreading the mix | Even coverage without puddles |
| Spike shoes | Walking on wet epoxy | Prevents footprints in the coat |
| Roller with correct nap | Back-rolling | Smooths squeegee marks |
| Mixing paddle and drill | Blending resin and hardener | Consistent cure |
| Moisture meter | Testing the slab | Prevents coating failure |
| PPE and respirator | Safety | Protects against fumes and dust |
Mixing and applying epoxy is where most DIY jobs go wrong. The resin and hardener must be combined at the exact ratio on the label, no guessing.
Here's the sequence:
Epoxy flooring takes roughly 12 to 24 hours to become tack-free and walk-on ready, but full cure takes longer. Most systems need several days before you can park a car or move furniture back.
Timing depends on:
Failed epoxy floors almost always trace back to preparation. Here is how to spot the common problems and what to do about each.
| Problem | Likely Cause | Mechanism | Fix |
|---|---|---|---|
| Peeling or delamination | Moisture or poor profiling | Vapour pressure from below exceeds the coating's bond strength, or the epoxy has nothing to key into | Strip, moisture-test, re-profile to CSP 2-3, recoat |
| Bubbles and blisters | Trapped moisture or outgassing | Air or vapour expands under the curing film and pushes through before it hardens | Test slab, apply a moisture-tolerant primer, roll out with a spiked roller |
| Fish eyes | Oil, silicone, or release-agent contamination | Surface energy is too low for the epoxy to wet out, so it pulls away into craters | Degrease, grind back, re-clean with a solvent wipe |
| Soft or tacky patches | Wrong mixing ratio or incomplete mixing | Unreacted resin or hardener never cross-links, so the film stays plastic | Remove affected area and recoat with a correctly mixed batch |
| Uneven colour | Poor mixing or cold conditions | Pigment and hardener disperse unevenly when the mix is cold or under-blended | Recoat affected areas; work within the product's temperature range |
| Orange-peel texture | Roller nap too long, or coating applied too thick | Solvent or air cannot escape evenly, so the surface cures with a dimpled skin | Sand back and recoat with the correct nap and spread rate |
DIY looks cheaper on paper. It rarely is once you count everything.
DIY is a reasonable choice when:
Hire a professional when:
Epoxy resins and hardeners are hazardous substances. In Australia, the model Work Health and Safety Regulations and the Globally Harmonized System (GHS) for chemical labelling apply to how these products are supplied, labelled, and used in workplaces. For a DIYer, the practical implications are:
Epoxy floor installation rewards patience and punishes shortcuts. The steps that matter most, moisture testing and surface profiling, are the ones most guides skip.
Epoxy flooring typically cures in 24 to 72 hours for foot traffic, but full chemical cure takes 5 to 7 days. Factors like ambient temperature, relative humidity, and the specific epoxy formula affect curing time. In cooler or more humid conditions, allow extra time before placing heavy loads or exposing the floor to water.
Yes, diamond grinding is the preferred method for concrete surface preparation for epoxy. It creates a rough profile that helps the epoxy bond. If grinding isn't possible, acid etching with muriatic acid can work, but it's less consistent and requires careful neutralisation. Always test the surface for porosity and moisture first.
Epoxy can be applied over old concrete if it's structurally sound and free of contaminants. Repair cracks with epoxy filler, remove any existing sealer, and ensure the surface is clean and dry. Moisture testing is critical: if moisture vapor transmission is high, a moisture barrier primer may be needed to prevent bubbling or delamination.
DIY epoxy installation costs less but requires careful surface prep, correct mixing ratios, and proper application tools. Professional installation by a specialist like Spray Pave Pro ensures correct substrate preparation, moisture testing, and high-quality materials, reducing the risk of premature failure. Professionals also have commercial-grade equipment for grinding and mixing.
