
Last Updated: September 19, 2026
The first step in repairing cracks in spray on concrete is determining whether you're dealing with a structural or cosmetic problem, as this changes your repair approach.
Structural cracks (typically wider than 3mm) indicate substrate movement and may leak water. Cosmetic cracks are hairline, surface-level, and don't compromise slab integrity.
Structural damage requires professional intervention. Homeowners often misidentify crack severity, alarming-looking cracks may be cosmetic, while hairline cracks can signal deeper problems.
Here's how to tell the difference:
If unsure, treat it as structural until proven otherwise, professional assessment costs far less than a failed repair.
The crack must be completely clean before applying filler or sealant, this determines whether your repair lasts months or years.
Dirt and debris prevent bonding. Remove loose material with a wire brush or compressed air; use a shop vacuum with brush attachment for wider cracks.
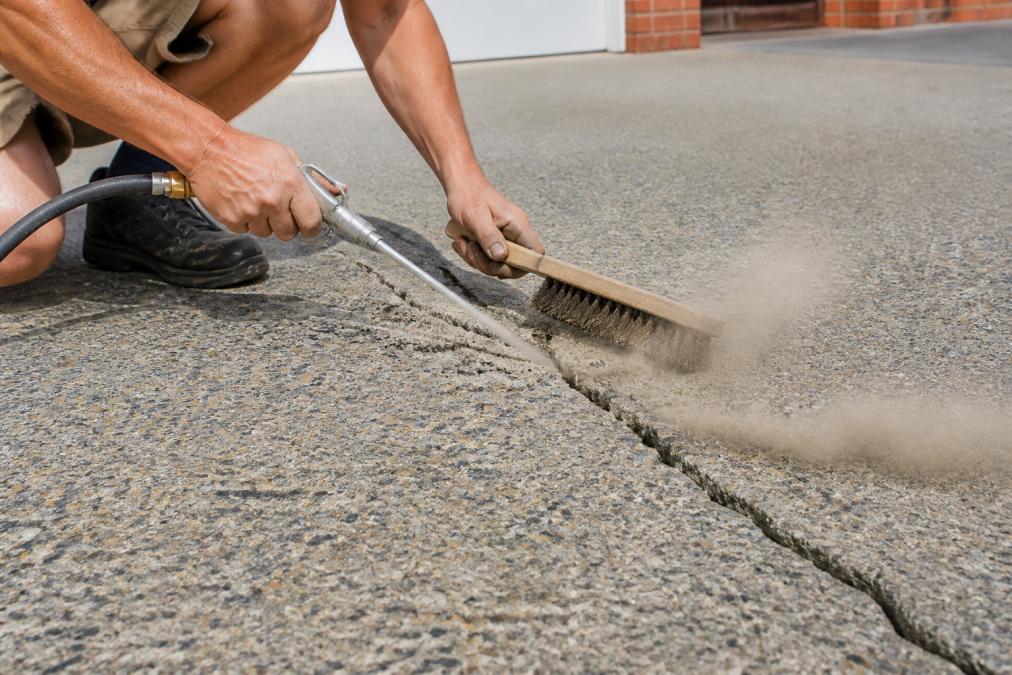
Assess moisture next, trapped moisture prevents proper filler setting. Allow wet cracks to dry completely (typically 24-48 hours depending on conditions).
For wider cracks (3mm+), use a concrete chisel to create a V-shape, which improves bonding surface area.
Once clean and dry, you're ready to move forward.
Choosing the right filler is critical, some perform poorly on decorative surfaces or cause hidden failures beneath spray-on layers.
Understanding spray-on compatibility
Spray-on concrete is a thin decorative layer (3-6mm) bonded to a base slab, where moisture, adhesion, and flexibility interact differently than in solid concrete.
The most common failure is delamination: moisture trapped under the spray-on coating causes blistering or separation. Rigid fillers that trap moisture cause failure within months.
Filler types and spray-on performance
Concrete slurry (cement, water, fine aggregate) is inexpensive and works well for structural cracks in standard concrete. However, slurry shrinks as it cures, leaving a gap. More critically, slurry is rigid and doesn't accommodate the minor flexing that spray-on surfaces experience. It also rarely matches the colour of spray-on concrete, making it unsuitable for visible surfaces. On spray-on systems, slurry often fails because it can't flex with the thin decorative layer.
Polyurethane caulk is the best choice for spray-on concrete repairs. It's flexible, accommodates minor movement without cracking, and bonds well to the porous spray-on substrate. Polyurethane also allows trapped moisture to escape gradually rather than building up pressure beneath the surface. It works particularly well for cracks wider than 3mm and in areas exposed to moisture, like pool surrounds or areas with poor drainage. The downside is cost (typically 2-3 times more expensive than slurry) and the difficulty of colour matching. However, the flexibility and moisture tolerance make it worth the investment for spray-on systems.
Epoxy-based fillers offer superior bonding and durability and cure hard without shrinkage. Epoxy works well for both structural and cosmetic repairs on standard concrete. However, epoxy is rigid when cured and can trap moisture beneath spray-on coatings, increasing delamination risk. Epoxy is best reserved for non-decorative concrete or for structural repairs where flexibility isn't a priority. If you use epoxy on spray-on concrete, ensure the crack is completely dry and consider applying a breathable sealer over the repair to allow moisture escape.
Rapid-setting patching compounds are convenient and widely available, but they often crack as they cure, particularly on spray-on surfaces where flexibility matters. Many contain Portland cement and aggregate, making them rigid and prone to shrinkage. Avoid these for spray-on concrete unless the crack is purely cosmetic and in a low-moisture area.
Moisture management before filling
Assess moisture before selecting filler. Use a moisture meter; if readings exceed 15%, allow 48-72 hours drying before filling.
For cracks in areas prone to standing water, fix drainage problems first or the repair will fail.
Colour and texture considerations
For visible repairs, prioritise tintable fillers. Polyurethane can be painted after curing; epoxy can be tinted with pigments; slurry is difficult to match.
Practical selection guide
Check product labels for spray-on or decorative concrete compatibility. If not mentioned, test on a hidden area first or choose a product with explicit endorsement.
Application technique is as critical as filler choice when repairing cracks in spray on concrete, poor technique is the most common reason repairs fail.
Apply a bonding agent to the crack with a brush, coating thoroughly. Wait per product instructions (usually 5-15 minutes).
Fill the crack with a trowel or putty knife, pressing firmly from end to end. Overfill slightly; for wider cracks, apply in layers.
Use a flexible putty knife or rounded-edge trowel to avoid damaging textured spray-on surfaces.
For cracks longer than 1 metre, work in 30cm sections to maintain consistent pressure before filler sets.
Allow full curing (typically 24-72 hours per label). Moisture and temperature affect curing speed.
Once cured, smoothing and colour matching determine whether the repair blends or stands out.
Smoothing the filled crack
Sand with medium-grit sandpaper (120-150 grit) to level the filler with surrounding concrete.
For textured surfaces, sand the filler to match the texture profile rather than creating a smooth patch.
Use a sanding block for even pressure. Vacuum dust before finishing.
Understanding spray-on colour variation
Spray-on colour varies due to multiple application passes, weathering, sealing, and fading, matching is genuinely difficult.
Photograph in daylight and shade to assess colour variation. If significant, aim to blend rather than perfectly match.
Practical colour-matching techniques
Step 1: Assess the existing colour and finish
Determine if sealed (darker, glossier) or unsealed (lighter, matte). Run your hand over the surface to check.
Note the colour undertone (warm or cool grey), matching undertone is as important as matching shade.
Step 2: Test concrete stain or paint on a hidden area
Hardware stores stock concrete stains and paints designed for spray-on surfaces in various greys, taupes, and earth tones.
Test stain or paint on a hidden area and allow full curing (24-48 hours) before assessing match, wet and dry colours differ.
If the test doesn't match, try a different shade or use spectrophotometer colour-matching services (often free or low-cost).
Step 3: Apply stain or paint to the repair and surrounding area
Apply stain or paint to the repair and a 30-50cm border around it to help the repair blend.
Apply two or three thin coats rather than one heavy coat for better coverage and colour match.
Use appropriate brushes or rollers per product instructions.
Step 4: Match the sheen (if the surface is sealed)
If the original surface is sealed and glossy, apply a matching sealer over the repair after paint cures to unify appearance and protect from moisture and UV.
If unsealed and matte, apply a matte sealer for protection.
Step 5: Texture replication (for heavily textured surfaces)
For pronounced textures (broom finish, aggregate exposure), colour matching alone won't be enough, texture must also match.
For minor texture differences, light sanding helps. For significant differences, apply spray-on concrete over the repair, a specialist task requiring professional equipment.
Accepting visible repairs
For highly visible cracks with complex texture or colour, accept that perfect matching may be impossible.
Sealing the repair and surrounding surface
The best repair is the one you never need. Prevention is far simpler than fixing damage after it occurs.
The decision between DIY and professional repair depends on the crack's size, location, and your comfort level.
DIY works for:
Professional repair is better for:
The best concrete crack filler depends on crack width and depth. For hairline cracks (under 3 mm), liquid concrete sealers or concrete caulk work well. For wider cracks (3-6 mm), use a concrete patching compound or mortar-based filler. For cracks deeper than 6 mm, injection-grade epoxy or polyurethane fillers provide superior bonding and structural integrity. Always choose a filler compatible with spray-on concrete substrates and check the manufacturer's guidance for moisture tolerance and curing times before application.
Colour matching requires testing filler products on a concealed area first. Many concrete patching compounds come in multiple shades; select the closest match to your existing spray-on surface. Once applied, the filler may appear slightly different until fully cured and sealed. Applying a concrete sealer over the repair helps blend the colour and protects the fix. If the existing surface has significant weathering or discolouration, consider sealing the entire area for uniform appearance rather than attempting to match a single repair.
Yes, hairline cracks should be repaired early, even though they appear minor. Small cracks allow moisture to penetrate the substrate, leading to expansion, delamination, and structural deterioration over time. In spray-on concrete, moisture ingress can compromise the bond between layers and accelerate damage. Sealing hairline cracks with a liquid concrete sealant or thin caulk prevents water entry and stops cracks from widening. Early intervention is far more cost-effective than addressing deep structural damage later.
Call a professional if cracks are deeper than 6 mm, show signs of structural movement, affect large areas, or if the surface has delamination or spalling. Professionals assess whether damage is cosmetic or structural, have access to industrial-grade fillers and equipment, and can colour-match and texture-finish repairs seamlessly. They also understand moisture management in spray-on systems and can apply protective coatings to prevent future cracking. If you're uncertain about the damage severity or repair method, professional evaluation protects your investment.
